

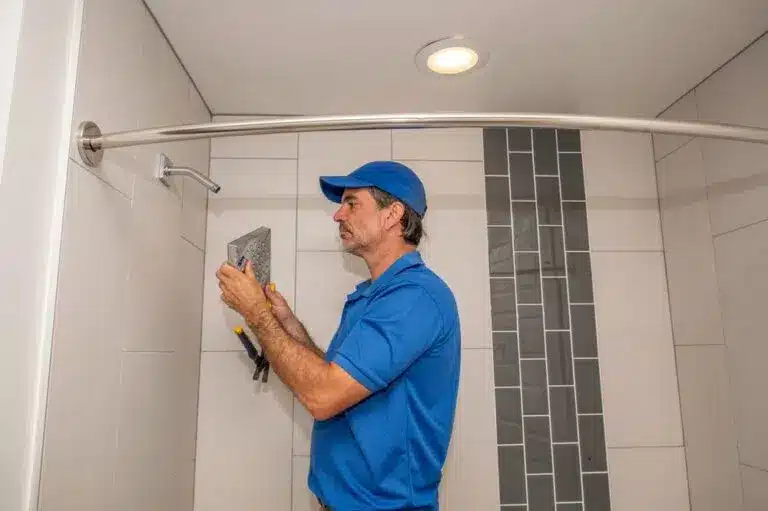
DIY Showerhead Removal and Replacement Methods
Whether you’re looking to replace an old showerhead or clean your current setup, there are a few situations where it pays to know how to remove and replace an existing showerhead. The ability to do this without risking any damage to the showerhead itself or related components will allow you to change out or clean your showerhead regularly with no added hassle or cost.
At My Buddy the Plumber, we’re happy to work with our clients for all their plumbing needs, including offering expertise on DIY jobs like these — or taking over ourselves if any of your needs include areas that should not be attempted by non-professionals. What are the basic steps involved in removing, cleaning and replacing your showerhead? Here’s a primer for those looking to perform this job on their own.
Be Realistic About Your Skills
Before we get started with the steps to follow here, we wanted to put this clarifier out there loud and clear: If any part of the process we’re about to describe seems intimidating for you, or if you’re worried you might hurt yourself or damage your plumbing system by carrying out any part of it, simply call our plumbers. There’s no rule saying you have to complete these tasks on your own, and you’re not on your own the second you call the professionals, so no need to put yourself in danger.
Now that we’ve stated that clearly, let’s move forward with the basic tools and steps for a DIY showerhead removal and replacement.
Tools Required
Here are the basic tools or items you’ll need for removing and replacing a showerhead:
- A tarp or garbage bag to protect your bathroom floor
- A standard or adjustable wrench, or pliers in some cases
- An old toothbrush, toothpick or needle-nose pliers (optional)
- Safety glasses
- Plumber’s tape
- Vinegar
- A gallon bag
- Steel wool
Once you have these items all prepared, you can move forward to our next steps.
Water Shut-Off
Before you begin any of the actual removal steps for your showerhead, it’s important to shut off the water to the shower in order to avoid any dangerous or costly mishaps. You can do this by turning off the water at your home’s main shut-off valve, which is typically located in the basement or garage near where your pipes enter your house.
If you don’t shut the water off before you begin this process, you run the risk of spraying water everywhere when you remove the showerhead, which could damage your bathroom flooring as well as your own person. So please, heed our warning and save yourself potential trouble down the line by shutting off the water before you start.
Protecting the Space
Next up, it’s time to ensure your entire bathroom space is protected as you get started. Take your tarp or garbage bag and lay it out on the floor beneath the shower. This will protect your bathroom tiles or flooring from any water that may escape when you’re removing the showerhead.
It will also block your surfaces from any rust shavings, falling metal or other debris that could come loose when you’re working on the showerhead. If you have an old toothbrush, toothpick or needle-nosed pliers on hand, you can also use them to help clean any gunk or debris that may fall out from the showerhead when you remove it.
Removing the Showerhead
Now it’s time to get started with the actual removal process. First up, you can try to remove your showerhead simply by twisting it by hand — this won’t usually work, but there are some cases where it will. If this doesn’t work, you can try using a wrench or pliers to get a better grip on the showerhead and loosen it that way.
Just be careful not to use too much force when twisting or pulling on the showerhead, as you could easily damage it or break off any of the connections if you’re not careful. When you have the showerhead removed, place it on your tarp or garbage bag for temporary storage.
If you’re having problems removing the showerhead with your wrench or pliers, you will need to involve vinegar and your gallon bag. Fill the bag up with vinegar, then tie it around the showerhead and leave it overnight to soak. You may also need to do this if you can’t pull the showerhead off with your hands, and it’s simply too tight to remove by hand. By morning, the vinegar should have eaten away at any rust or other materials holding the showerhead in place, making it easier to remove without damaging anything.
Cleaning Methods
If you’re performing this task with the goal of cleaning your showerhead, doing so is simple and easy. Just scrub the pipe threads with steel wool and vinegar, then rinse it out with water to get rid of any lingering vinegar.
Replacing (Or Installing New) Showerhead
When it’s time to re-attach (or to simply attach, for new showerheads being installed) your showerhead, we recommend wrapping the pipe threads with plumber’s tape — and from here, following all manufacturer directions for installing the new showerhead.
This ensures that you don’t get any leaks in your bathroom, which can save you money on water bills and make for a more pleasant bathing experience with no drips or drops to deal with. You should also test the new setup by turning your water back on and trying out the shower, looking carefully for any leaks or problems.
And that’s all there is to it! With these simple steps, you can easily remove your old showerhead, clean it or replace it with a new one, without any trouble or difficulty. Once again: If you have even minor concerns about your abilities to carry out any part of this process, or if you’d simply rather rely on the pros, call our plumbers for assistance.
For more on this or any of our plumbing or HVAC services, speak to the team at My Buddy the Plumber today.

Contact Us Today!
Sidebar


today
to schedule your next appointment
We make sure to take care of your plumbing system with our professional touch. We get the job done fast and our prices are reasonable.
Call TodaySchedule Appointment


Join the My Buddy Club
Easy Maintenance & Exclusive Benefits
The My Buddy the Plumber’s Club is our comprehensive maintenance membership program that will protect your home comfort systems! From an in-depth home plumbing inspection to thorough furnace and air conditioning tune-ups, the club does it all. Our team will ensure your HVAC, plumbing, and electrical systems are running safely and in top shape. Joining our club can also provide plenty of exclusive perks, such as:
- Priority service
- 10% discount on repairs
- No after-hours fees
- Peace of mind
- Matched manufacturer’s warranty
- Tank water heater flush
- Drain cleaning
- Electrical safety inspection


